Bootstrapping AWS: 2021 edition
by Foo
Hello again, it’s been a while! You might remember, some time ago in a previous post, I discussed how to bootstrap an AWS account for a small team. Do you remember? No? Well that’s perfect! In fact, I was just about to ask you to forget about it entirely: there are better ways.
So here we are, to once again discuss how to bootstrap an AWS account organisation. Secure, scalable, with a good engineer onboarding experience, free as in beer and, most importantly, free from endless rabbitholes 🐇🕳️ !
The need
We’re after an AWS setup for either personal use or other low-budget scenarios that:
- has a good engineer authentication experience
- has a good engineer onboarding experience
- supports MFA, even for console operations
- is able to later scale without compromising security properties
- is free
The solution
Start straight away with an AWS Organisation and enable AWS SSO for it.

Yeah, I know what you’re thinking: “I just want to share my cat pics on s3, multiple accounts are overkill!”. And you’d be right if that’s all you’ll ever use your AWS account for, but if you might end up doing anything more than this, even very infrequently, then bear with me for a minute: you’ll thank me later.
Why is this better?
First, let’s just assume that you’re not going to use the root account besides initial setup.
Using things infrequently, you might want to just login on the web console and do clicky clicky things from there. And that’s fine, but if you do things infrequently, it’s easy to forget how to do it, or how to do it right. Automating things can help with that, and to automate things you need to access the CLI as well. Or maybe you do things on AWS often, and if that’s the case you definitely want to automate stuff out! Now to access the CLI, you would be tempted to use access tokens. And that’s fine, until it isn’t and the access token gets leaked or lost. So you might want to introduce some form of MFA’d AssumeRole, and that’s ok too but also extra complexity, clunky and doesn’t like U2F… at least, not yet. And I’ll spare you the details of what happen when you enroll someone else in the system: it’s just unpleasant.
What about multiple accounts then? You would normally be fine with one but - then your friends ask to be able to upload and share the cat pictures you all took together at CatFest last year. And your aunt, who travels a lot, asks if you can help her set up a VPN because airport WiFi is dodge. And your 3-years-old niece… well, she asked for a k8s cluster for her birthday!
Ok, fine, relatives being concerned about airport WiFi security sounds far fetched. Fair.
But still - a few little things, and they should all be independent of each other. You can, and probably should, go and define granular IAM policies for all of them but - why not using entirely separate AWS accounts? It doesn’t solve all the problems - an overly permissive policy stays an overly permissive policy - but as far as natural authorisation boundaries go, AWS accounts makes for a damn fine bulkheading control.
Installing Terraform
I keep speaking about automation and we’ll definitely get to Terraform in a minute - but first, there’s a handful of manual steps to take. Unfortunately Terraform doesn’t support opening an AWS account, nor setting up a handful of SSO things. And, you’ll have to set up Terraform itself!
Let’s start form there. You might have Terraform installed already - or not, but what I’d recommend is to install tfenv : this would allow you to avoid version conflicts across different infrastructure stacks and get better stability by locking versions.
To install tfenv, follow the instructions on its GitHub README, and make sure to enable the GPG verification feature too.
After that, you can tfenv install latest to grab the most recent version.
Creating your AWS Organisation
If you don’t have one, you should start by creating an AWS account. Once you’ve done so, or if you already have one, log in with your root account. Using the root account for anything at all might sound strange - it’s a risky practice! But someone needs to do the initial setup - so using the root account this once and (hopefully!) never again.
First of all, you should pick a home region. This depends on where you’re based - for me it’s going to be London, or eu-west-2 , you pick the region that is closest to you - or makes the most sense to you for whatever other reason. When using the AWS Console, make sure to switch to that region from the dropdown on the top-right corner.
Our goal is to enable AWS SSO - but that requires AWS Organisations to be enabled first. This is something that we can - and should - control it via a Terraform stack, let’s set one up. Create a new directory for the stack wherever you keep your IaC under version control:
$ cd ~/projects/iac-repo
$ mkdir aws-organisation
$ cd aws-organisation
$ touch main.tf
This main.tf will be very small for now, and simply declare the organisation. Use your favourite editor (which should of course be vim 😛 ) to add the following content to the main.tf file:
terraform {
  required_version = "~> 1.0.8"
  required_providers {
    aws = {
      source  = "hashicorp/aws"
      version = "~> 3.0"
    }
  }
  backend "local" {}
}

provider "aws" {
  region = "eu-west-2" # change to your home region
  default_tags {
    tags = {
      "tf:stack" = "aws-organisation" # this is up to you - I like tagging resources by source stack
    }
  }
}

resource "aws_organizations_organization" "org" {
  aws_service_access_principals = [
    "sso.amazonaws.com",
  ]

  enabled_policy_types = [
    "SERVICE_CONTROL_POLICY"
  ]

  feature_set = "ALL"
}
Now let’s grab a token to authenticate Terraform. In the AWS Console, navigate to “My Security Credentials” from the dropdown on top-right, then create a new Access Key. Copy the values shown into a new shell, then proceed to plan and apply:
$ export AWS_ACCESS_KEY_ID=...
$ export AWS_SECRET_ACCESS_KEY=...
$ terraform plan
// snip tf plan output - should  be creating the organisation and nothing else
$ terraform apply
// snip tf apply output
Are you sure? yes
// snip more out
Enabling SSO
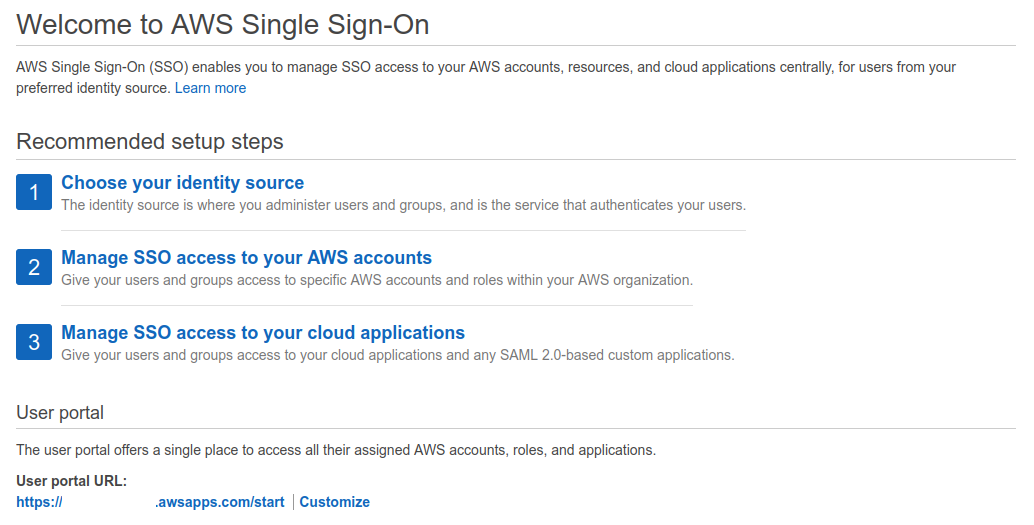
That’s great, we have the org enabled. Now on to SSO! Enabling SSO and setting up admin instance and store are unfortunately manual actions, so we’ll have to jump back into the AWS Console first before coming back to Terraform. Find SSO via the search bar:

Make sure you’re in the right region - then smash that “enable” button!

The wizard is rather straightforward - pick “AWS SSO” as your identity source and that’s about it. Take note of the “User portal URL” generated for you: that’s going to be your front door from now on. You’ll also get a chance to customise this URL after the wizard, from SSO’s “Settings” page.

Speaking about the Settings page, that’s also where you can tweak the MFA settings. I definitely want to make sure that the “Require to register an MFA device at sign in” is on, usage of hardware security keys is allowed and users have the ability of manage their own devices. I find this combination to provide a good combination of security and user experience - usage of MFA is mandated but using self-managed WebAuthn factors makes it a breeze to use.

Users and groups
Next up: user and groups creation, which is also a manual task - so let’s set up some for yourself right away.
From the “Groups” page, create a new group and name it Owners . Don’t associate any permission with it just yet - we’ll do this in IaC.
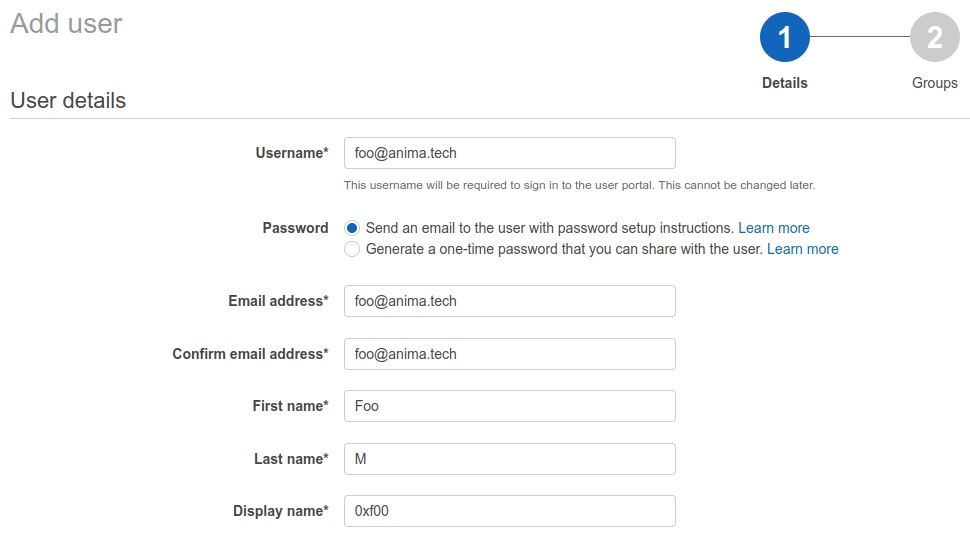
Instead, head to the “Users” tab and create a new user for yourself: this is what you’ll be using going forward instead of the root account. Details to provide are up to you - the email needs of course be valid as that’s what you’ll use to receive sign-up links and password resets. The username will be what you use as an identifier to log in, it’s not just a display name (and in fact you won’t be able to change it).
If you have a standard naming scheme that you would like to adopt, it’s worth starting now: I like going for the same as email address. If you really want to change a username later on it’s not too big of a deal anyway: create a new SSO user and once it’s all set up you can get rid of the old one.
Pick the “Send an email to the user with password setup instructions” as your onboarding option - it avoids the clunkier experience of receiving your credentials over a questionably secure medium “because that’s a temporary password anyway”.

In the second step, assign your new user to the “Owners” group you created previously.
Permissions
Back to Terraform! With SSO enabled and groups available, the permission assignments can (and should) all be managed via IaC. Let’s create a new TF stack alongside the aws-organisation one:
$ cd ~/projects/iac-repo
$ mkdir aws-sso
$ cd aws-sso
$ touch main.tf
This stack will take care of all the SSO-related things. If you prefer to stick everything together in a single stack together that’s also fine - I would keep the two loosely coupled but it’s easy enough to split them when they start growing too much. Here is the code - which will need your management account id specified in the local variables, so take note of it from the AWS Console and copy it in:
terraform {
  required_version = "~> 1.0.8"
  required_providers {
    aws = {
      source  = "hashicorp/aws"
      version = "~> 3.0"
    }
  }
  backend "local" {}
}

provider "aws" {
  region = "eu-west-2"
  default_tags {
    tags = {
      "tf:stack" = "aws-sso" # this is up to you - I like tagging resources by source stack
    }
  }
}

locals {
  management_account_id = "<YOUR MANAGEMENT ACCOUNT ID HERE>"
}

data "aws_ssoadmin_instances" "ssos" {}

data "aws_identitystore_group" "owners" {
  identity_store_id = tolist(data.aws_ssoadmin_instances.ssos.identity_store_ids)[0]

  filter {
    attribute_path  = "DisplayName"
    attribute_value = "Owners"
  }
}

resource "aws_ssoadmin_permission_set" "owners" {
  name         = "Owners"
  description  = "Permission for owners of the overall AWS Organisation"
  instance_arn = tolist(data.aws_ssoadmin_instances.ssos.arns)[0]
}

resource "aws_ssoadmin_managed_policy_attachment" "owners" {
  instance_arn       = tolist(data.aws_ssoadmin_instances.ssos.arns)[0]
  managed_policy_arn = "arn:aws:iam::aws:policy/AdministratorAccess"
  permission_set_arn = aws_ssoadmin_permission_set.owners.arn
}

resource "aws_ssoadmin_account_assignment" "owners" {
  instance_arn       = aws_ssoadmin_permission_set.owners.instance_arn
  permission_set_arn = aws_ssoadmin_permission_set.owners.arn

  principal_id   = data.aws_identitystore_group.owners.group_id
  principal_type = "GROUP"

  target_id   = local.management_account_id
  target_type = "AWS_ACCOUNT"
}
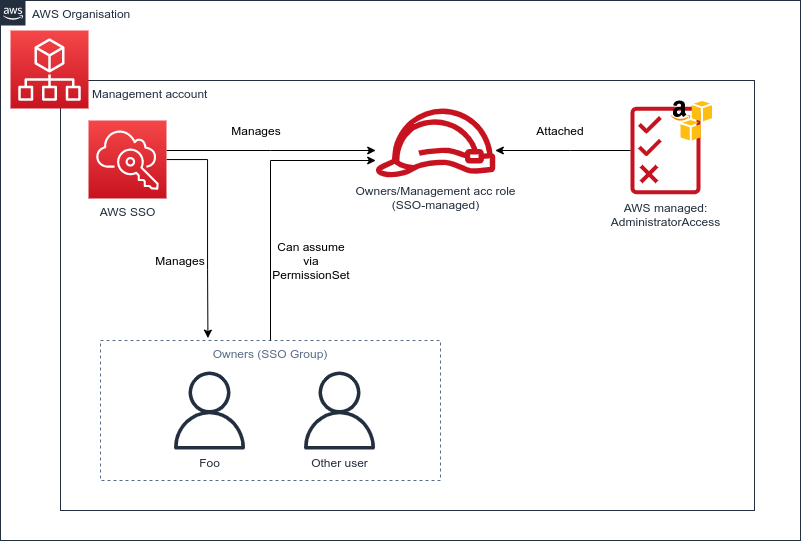
Once SSO is enabled and groups are created, you can reference them with data stanzas. What the rest of resources in this module do is to define a PermissionSet for organisation owners, attach the AWS-managed AdministratorAccess policy to the permission set and define the permission assignment as “Users that are members of the Owners group are entitled to the roles in the Owners PermissionSet in your management AWS account.”.
In the future, as you scale accounts where you want the same association to exist you can use Terraform’s for_each construct to replicate the aws_ssoadmin_account_assignment across multiple accounts. To allow a group to assume multiple roles (e.g. if you want your admins to also have a read only role to use for safer day-to-day inspection or troubleshooting) you can add a aws_ssoadmin_managed_policy_attachment resource, while scale to entirely new user groups and permission sets you’ll have to introduce new aws_ssoadmin_permission_set - aws_ssoadmin_managed_policy_attachment - aws_ssoadmin_account_assignment triplet.
Let’s apply. If you’re operating in the same shell as earlier, you should already have the necessary authentication tokens available:
$ terraform plan
// snip tf plan output - should  be creating the 3 sso resources
$ terraform apply
// snip tf apply output
Are you sure? yes
// snip more out
Testing and CLI configuration
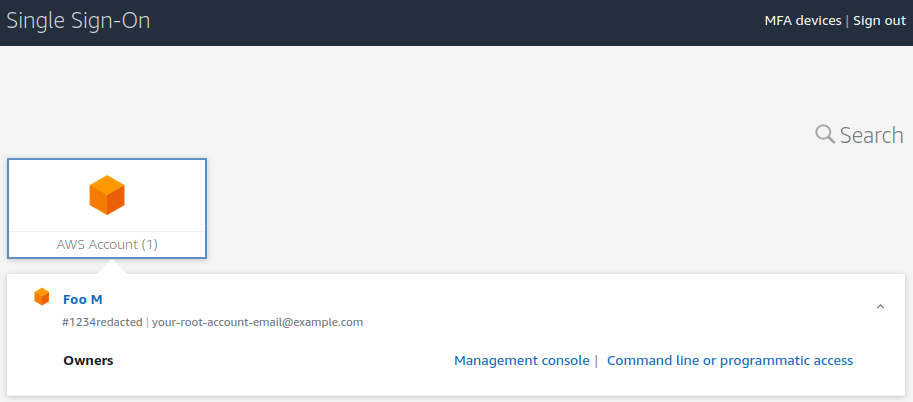
And that’s it! Your account should be ready to go, with an invite link in your inbox. The link should send you to the “User portal URL” you noted down when enabling SSO for registration, signin and MFA configuration. After completing the onboarding wizards, you should be presented with a screen that looks like this:

Congrats! From here, the “Management console” link will send you straight to your management account with ad admin role, while the “Command line or programmatic access” will generate a fresh set of temporary credentials to use in a console.
There’s a better alternative than pasting temporary credentials in consoles though: you can now use the aws sso command from your AWS CLI. To operate it, you need to register a new SSO profile, sign in to make the temporary credentials available to the shell and then use the CLI simply passing the --profile flag, as such:
$ aws configure sso
SSO start URL [None]: https://d-123yourssoid.awsapps.com/start#/
SSO Region [None]: eu-west-2
Attempting to automatically open the SSO authorization page in your default browser.
If the browser does not open or you wish to use a different device to authorize this request, open the following URL:

https://device.sso.eu-west-2.amazonaws.com/

Then enter the code:

ABCD-EFGH
The only AWS account available to you is: 123redacted321
Using the account ID 123redacted321
The only role available to you is: Owners
Using the role name "Owners"
CLI default client Region [eu-west-2]:
CLI default output format [json]:
CLI profile name [Owners-123redacted321]: owners

To use this profile, specify the profile name using --profile, as shown:

aws s3 ls --profile owners
$ aws sso login --profile owners
Attempting to automatically open the SSO authorization page in your default browser.
If the browser does not open or you wish to use a different device to authorize this request, open the following URL:

https://device.sso.eu-west-2.amazonaws.com/

Then enter the code:

ABCD-EFGH
Successully logged into Start URL: https://d-123yourssoid.awsapps.com/start#/
$ aws sts get-caller-identity --profile owners
{
    "UserId": "AROAASDASDQWEQWE123ZXC:[email protected]",
    "Account": "123redacted321",
    "Arn": "arn:aws:sts::123redacted321:assumed-role/AWSReservedSSO_Owners_12345678somenumber321/[email protected]"
}
During these steps you will be prompted for some options on the command line, and your default browser will be opened to authenticate into AWS (if you’re not already) and authorise the CLI.
Wrap up
Now that you’re all set, you can get ride of that ⚠️🔥hazardous root access key🔥⚠️. For this you’ll have to log in as root once again and disable the Access Key you previously created. You can now log out from root and relegate its credentials to the closet - at least for a while.
You’ll also want to put all the IaC we wrote under version control. My suggestion is git but which tool and exactly how - that’s up to you. The important part is that you should definitely add the following files to the commit:
.terraform.lock.hcl.terraform-versionterraform.tfstate(unless you modified the above code to use remote state)
Conclusion
Congrats, now you’re all set up for security, scalability and (cheap) success!
What comes next is now up to you, here are some ideas you might want to explore:
- Add accounts for security audit, log archiving and workloads as per AWS Well Architected recommendations
- Enable base security services such as CloudTrail global logging and GuardDuty
- Invite more users
- Introduce Service Control Policies to avoid or restrict usage of unwanted regions
- Introduce Service Control Policies to avoid or restrict IAM Users usage
Have fun!
tags: AWS - Security Engineering - Terraform - IAM